
Learn how to roast Hatch green chiles at home in the oven or on the grill, plus save them for convenient use year-round by canning them. I'll show you how to do it all in this tutorial!
Hatch chile season is upon us! If you've never had the pleasure of experiencing New Mexico Hatch chiles, I hope you get the chance soon. And if you've found yourself with an abundance of fresh Hatch chiles, this post will teach you exactly what to do with them so you can enjoy their fiery goodness all year long!
What are Hatch chiles?
Hatch chiles are a type of pepper similar to Anaheim peppers, but they are grown specifically in the Hatch Valley in southern New Mexico. Harvested in August, they come in both green and red, with the green being picked sooner, while the red is left to mature a little longer to yield a sweeter pepper, and the heat level ranges from mild to very spicy. Hatch chiles lend a unique, smoky spice to anything you want to add a little heat to!
Why Roast Hatch Chiles?
The best way to bring out the smoky, delicious flavor of Hatch chiles is to roast them! After roasting, the blistered skin can easily be removed from the flesh for a softer bite and a nice texture for stirring into dishes and blending into and salsa and sauces.
Equipment You'll Need
- Tongs
- A sheet pan (for oven roasting)
- A large bowl
- Disposable gloves
- Canning-safe jars (I use half pint)
- New lids for jars
- A clean knife, skewer, or chopstick
- A clean rag
- A pressure cooker (not an electric one)
- Jar lifter (or you can use tongs)
How To Roast Hatch Chiles
Hatch chiles can be roasted on the grill or in the oven (or even over the flame of a gas stove if you are really patient using the same method!).
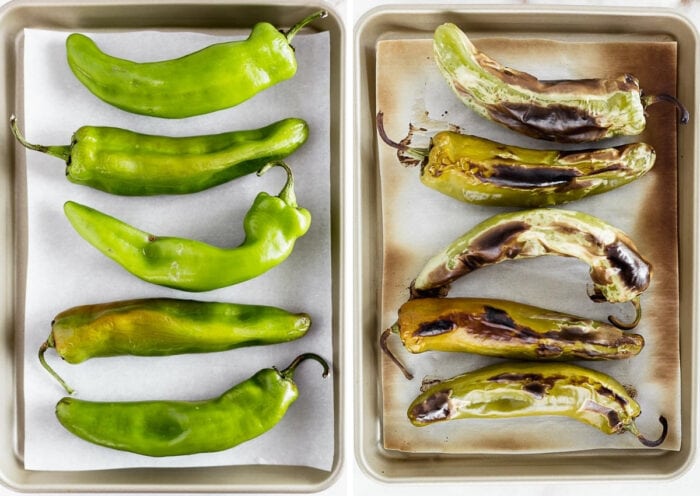
To Roast In The Oven:
- Place the top rack of the oven about 5 inches from the broiler. Heat the broiler to about 450°F.
- Place chiles on a baking sheet, and place it under the broiler. Roast the chiles, rotating every 3-5 minutes, until the skin is blistered all over. Careful not to burn it though, as this will make the chiles hard to peel.
To Roast On The Grill:
- Heat grill to hot heat (about 450°F).
- Place chiles on the grate directly over the heat and roast with the lid open, rotating every 3-5 minutes with tongs, until the skin is blistered all over. Don't get the heat too high or the peppers will burn rather than roast.
How To Peel Hatch Chiles
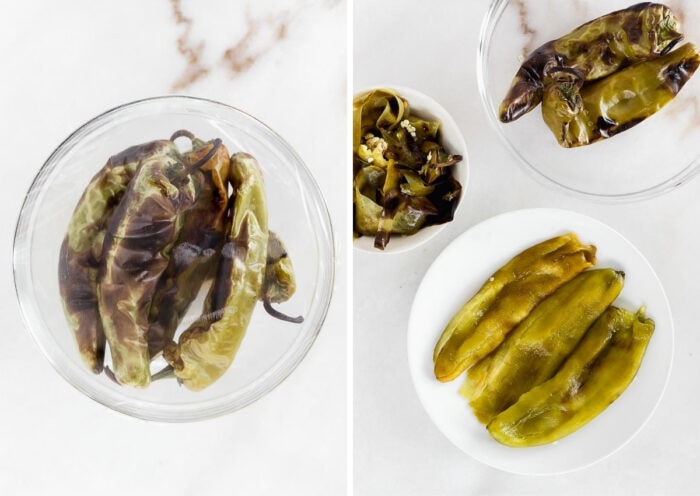
- After chiles are roasted, while they are still hot, place them in a large bowl or other heat-proof container and cover with foil, plastic wrap, or a lid to trap the steam. Let them rest for at least 10 or 15 minutes (or you can wait until they are cooled, which is what I prefer).
- Once cool enough to handle, use your fingers to gently peel the skin from the flesh. It should separate easily. Discard the skin.
- At this point you can also discard the seeds and stems to prepare for canning (this is what I do).
Tips For Roasting & Peeling Hatch Chiles
- Careful not to get the heat too high when roasting, or the flesh will burn, making the choles almost impossible to peel. You just want to blister the skin. Keep a close eye on the chiles and rotate them frequently.
- Don't skip the steaming step, or they will be harder to peel.
- Use gloves when peeling, especially if you have very hot peppers, to avoid burning your hands. (I've learned this the hard way - ouch!)
- If you have a few spots where the peel is difficult to remove, you can use a sharp knife to gently scrape it away or run it under water briefly to help it along.
Now on to the preserving part - canning! If you like to get your green chile fix year-round without relying on commercially canned green chiles that seem to be lacking in flavor, you can preserve your own Hatch chiles by canning them! Or maybe you just went overboard when buying chiles and you need to figure out what to do with them.
Why Can Hatch Chiles?
Why go through the trouble of canning Hatch chiles, you ask? Can't you just freeze them? Well, you can freeze them. But here's why canning is a much better option:
- Freezer space. Freezing chiles requires freezer space, which is a little hard to come by in my house, even though we have two freezers. Canned chiles can hang out at room temperature, so they don't take up valuable freezer real estate.
- Freezing increases the heat level. Another lesson I've learned the hard way. The first year we bought a bunch of Hatch chiles, we froze some. Upon making dinner with the thawed chiles, our mouths were on fire and we weren't even able to power through it to finish our meal. They were that spicy. Basically, as the water seeps out of the chiles when thawing, it leaves the capsaicin (the component that gives peppers their heat) more concentrated. So you get a REALLY spicy chile. Canning avoid all of that for a much more pleasant experience when you go to use your preserved chiles.
- Convenience. Canned green chiles are much more convenient to use than frozen ones. Dice them before you add them to the can if you'd like, or leave them whole. Then just open up a jar whenever you need them, no thawing required!
How To Can Hatch Chiles
- Once your chiles are roasted and peeled, it's time to can them! Here's how:
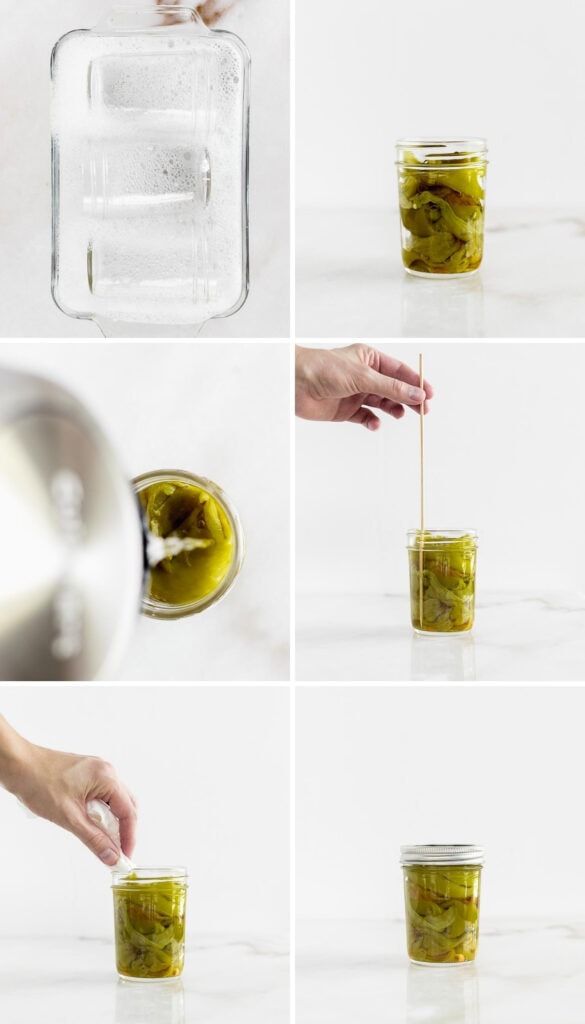
- Clean and sanitize your jars. You can use pint, half pint, or even quarter pint jars. First wash them in warm soapy water. Then sanitize them either by boiling them or placing them in the oven at 275°F for 10-15 minutes. Keep the jars hot for canning. Lids can be sanitized by boiling them.
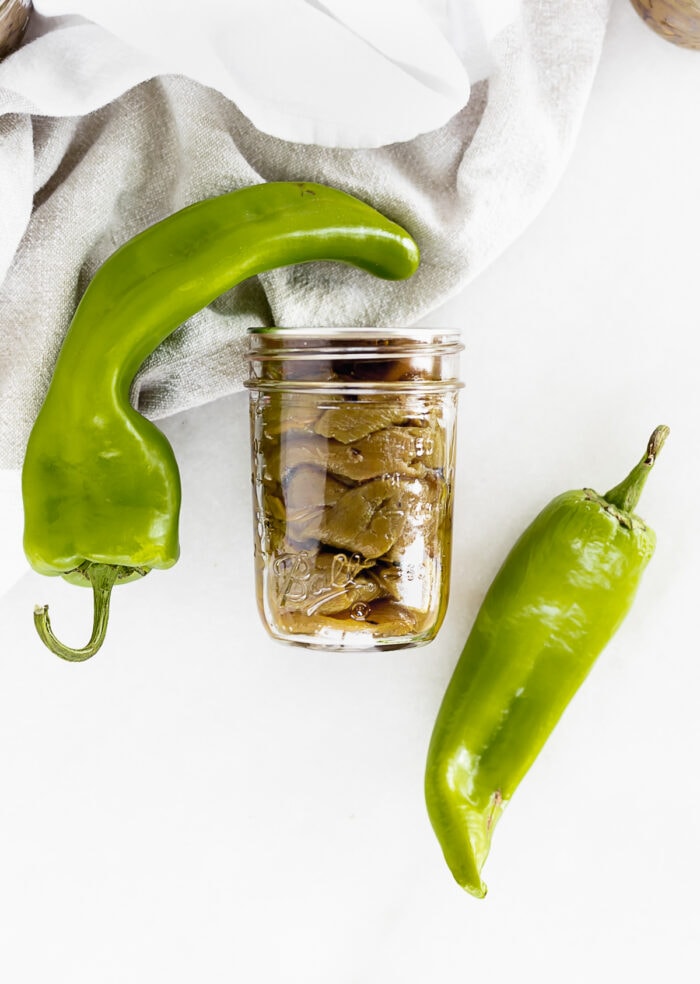
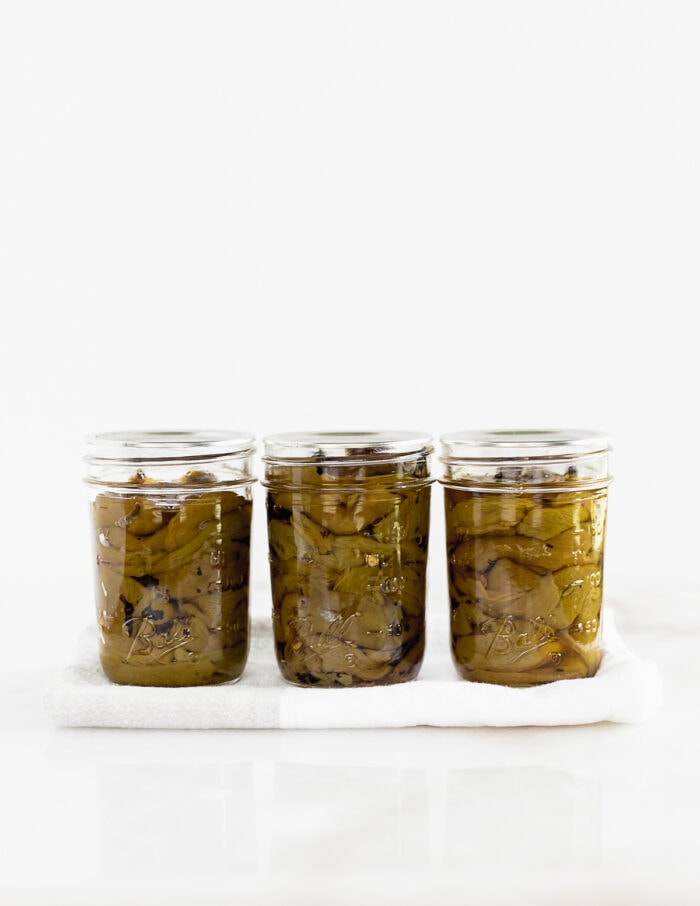
- Place chiles in sanitized jars, leaving a 1-inch headspace. I get about 4-5 whole chiles in a half pint jar.
- Cover chiles with boiling water (again, leaving a 1-inch headspace).
- Use a clean, dull knife, chopstick, or skewer to go around the edge of the jar to remove any air bubbles.
- Wipe the rims of the jars clean with a clean rag dipped in vinegar.
- Place new, sanitized lids on the jars. Screw on the bands finger-tight.
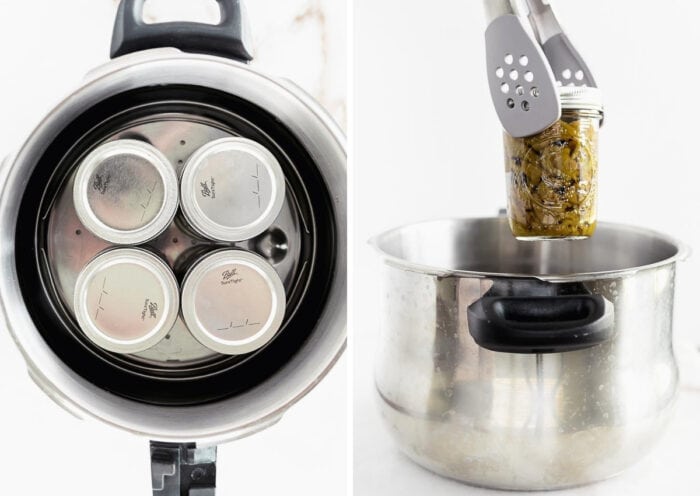
- Fill pressure canner with 2-3 inches of water.
- Keeping jars upright, place them in the rack inside the pressure canner. Close the lid, keeping the vent open. Heat on high until you see steam come through vent.
- Close the vent and allow canner to come to pressure (12 pounds of pressure, adding 1 pound for each 1000 ft above sea level), then start the timer.
- Process jars 35 minutes. Turn off the heat and remove the cooker from heat. Let the pressure canner completely depressurize naturally before opening the vent.
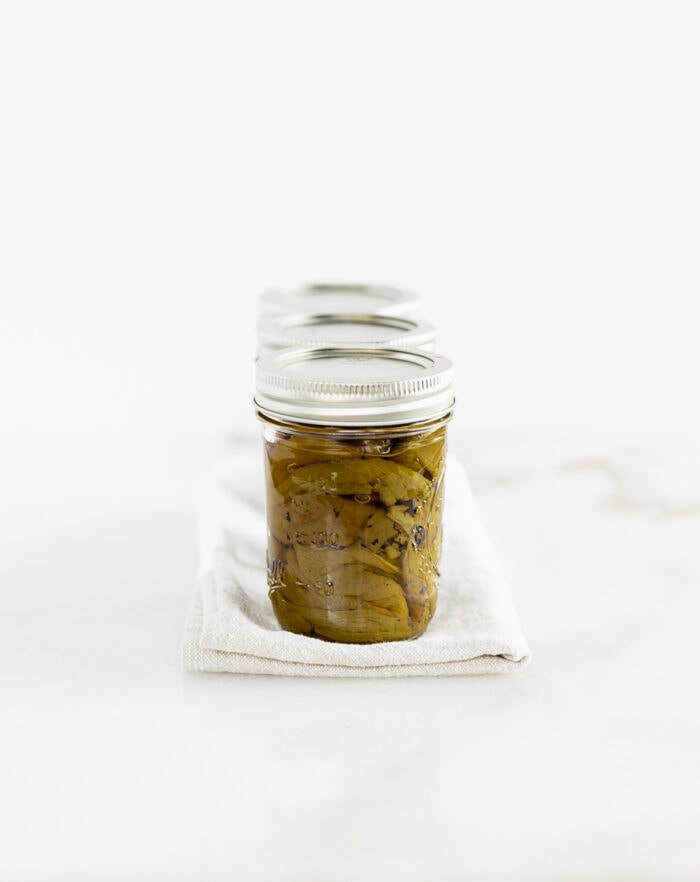
- Open the pressure canner and remove jars carefully with a jar lifter. Place them on a towel to cool for 12-24 hours at room temperature. You'll hear 'pops' as the lids seal.
- After 24 hours, check to make sure all cans have sealed by pressing down on the center of the lid. Sealed jars will not push down and pop back up. Once sealed, bands can be removed, if you want. Any unsealed jars can be kept in the refrigerator and used within 3-4 days.
For more detailed canning information, head to my beginner's guide to canning!
Tips For Successful Canning
- Try to get as many of the air bubbles out of the jars as possible. Air bubbles can cause contents of the jars to leak out during processing and jars not to seal properly.
- You can add salt to jars if you like. Salt if only for flavoring, and not for safety purposes here.
- Do not try to depressurize the pressure canner more quickly. The natural pressure release is part of the processing time.
- Be careful when opening the vent and the lid of the pressure canner so that any steam present doesn't burn you.
- For processing times at various altitudes, refer to this chart.
Can I use an Instant Pot to can chiles?
Canning recipes are tested at specific times and pressures for each recipe to ensure safety of the canned food. Instant Pots and other similar electric pressure cookers do not specify the pounds of pressure reached, therefore should not be used to can.
What To Do With Roasted Hatch Chiles
Try one of these delicious green chile recipes to use your canned Hatch chiles:
- Grilled Green Chile Chicken
- Green Chile Shrimp and Grits
- Hatch Chile Salsa Verde
- Green Chile Chicken Enchiladas
- Green Chile Chicken Mac and Cheese
- Hatch Chile Crab Cakes
- Hatch Chile Hush Puppies
- Green Chile Mexican Breakfast Casserole
- Slow Cooker Green Chile Corn Dip
Don't want to go through all of this trouble? Or maybe you just can't find green chiles. If that's the case, you can have roasted or fresh Hatch chiles sent straight to your door from my friends at Hatch Chile Store!
Jen says
Can i can them in a water bath instead of pressure canner?
Monnie says
Hi ! The Instant Pot MAX model has a pressure canning feature that is suitable to at least 5000 feet . It holds up to 4 wide mouth pints. I can mainly in small batches anyway, since I'm a single person, and I love it! Don't have to babysit it like I do my stove top pressure canners. Thanks for your recipe!
Zelda says
A pressure COOKER is not a pressure CANNER! Don't mislead people, it's too dangerous to be inaccurate.
Kim says
I have a pressure canner that is electric. It is a presto and made specifically for pressure canning. Just wanted to clarify that there are different types out there. The stovetop can be used but so can a specially made electric pressure canner.
Nancy Nowak Utech says
How long would I process for quart sized jars? I make a hatch green chili soup and pint won’t hold as many as I need for even one batch of soup so I need to process in quarts.
Kaleigh says
Hi Nancy,
From what I've read, quarts will process for the same amount of time.
James says
The process time would be the same. I would can them like Quarts of Green Beans. I see no difference in the Receipt.