
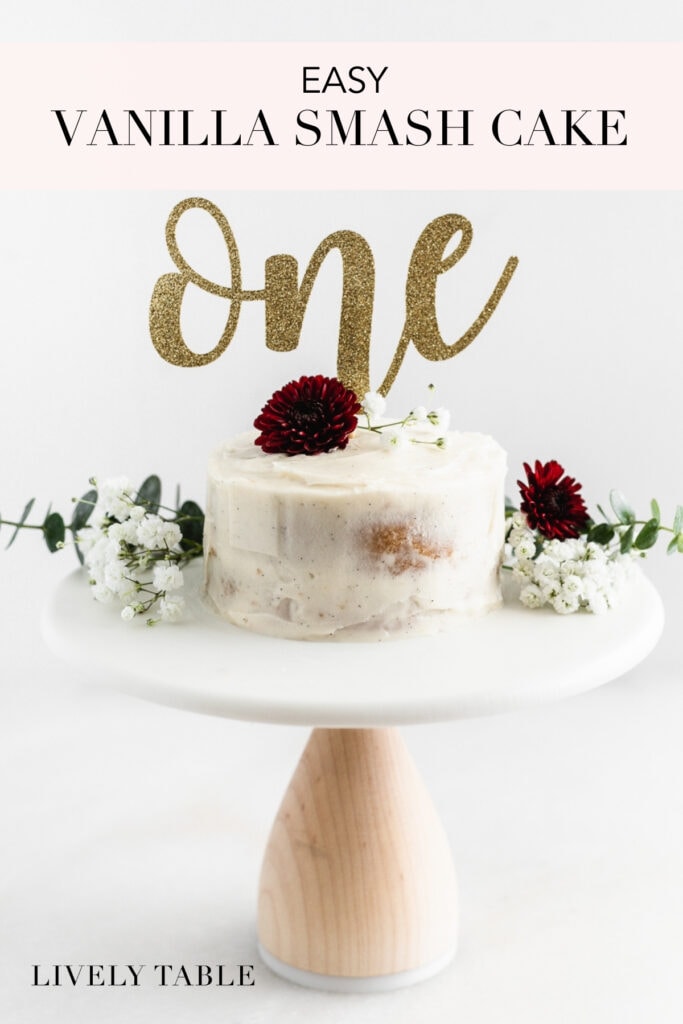
If your baby is turning one year old soon, you'll need a smash cake! You can make 2 tiny homemade cakes that are cute and delicious with this easy recipe for vanilla smash cake.
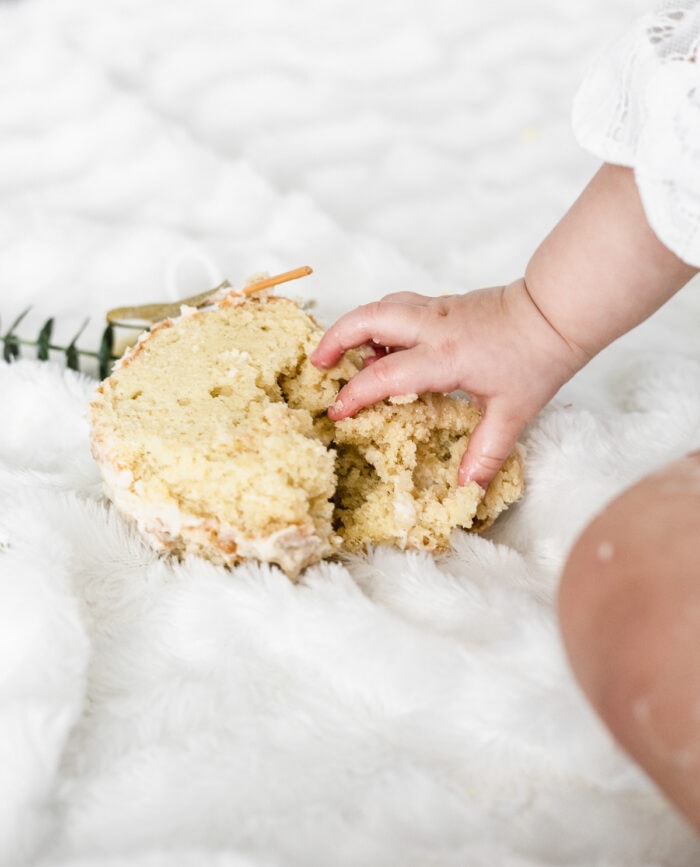
Everyone knows that watching a one year old dig in to a tiny cake a make a huge mess is the best part of a first birthday! I mean, don't we all just want to shove cake into our faces with our hands? It wouldn't be near as cute (or socially acceptable) if we did so as adults, though. So instead, make the most of your baby's first birthday with this smash cake recipe. Then prepare to take all the cute pictures to swoon over forever!
Why You'll Love This Smash Cake For Baby's First Birthday
This recipe is just like a regular white cake in all it's delicious glory, but tiny. It's moist, rich, and full of vanilla flavor with a simple vanilla frosting. It's easy to make, make-ahead friendly, and it makes TWO adorable smash cakes, so you can use one for a photo shoot and one for baby's actual birthday, you can have cakes for multiple celebrations, or you can give baby one to smash while you can your spouse eat the other (unsmashed) cake!
I know some of you may not be offering sugar to your soon-to-be one year old yet and are looking for a smash cake with no added sugar. I respect your decision and will be working on a fruit-sweetened smash cake soon. This is not that cake. It has a lot of sugar.
How To Make a Smash Cake
This smash cake recipe goes just like any other cake recipe, just smaller.
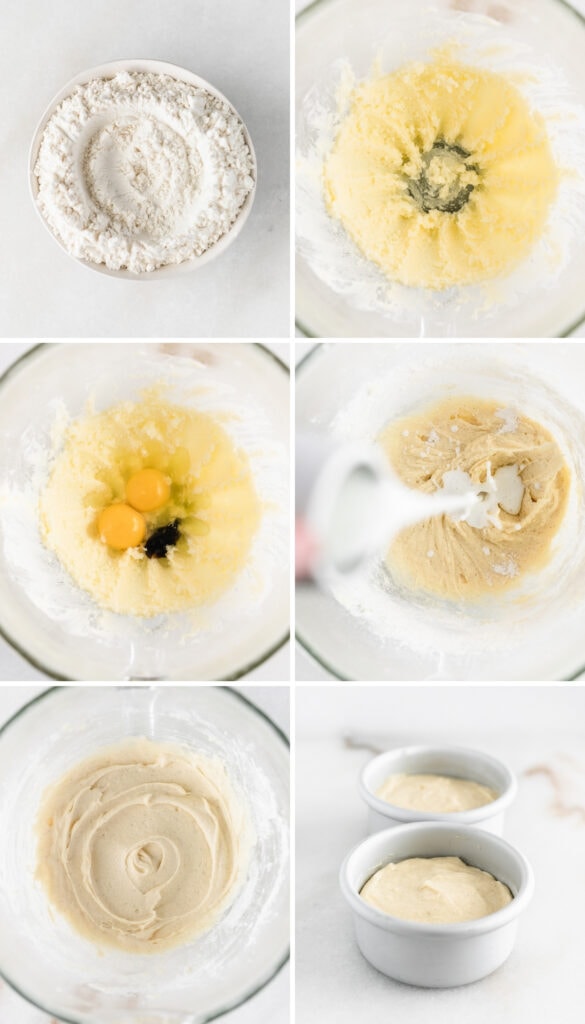
- Cream the butter and sugar together.
- Add the egg, egg yolk and vanilla and mix well.
- Add half the flour, then add the buttermilk, then the other half of the flour.
- Pour the batter into greased and floured cake pans. Bake for about 20 minutes at 350.
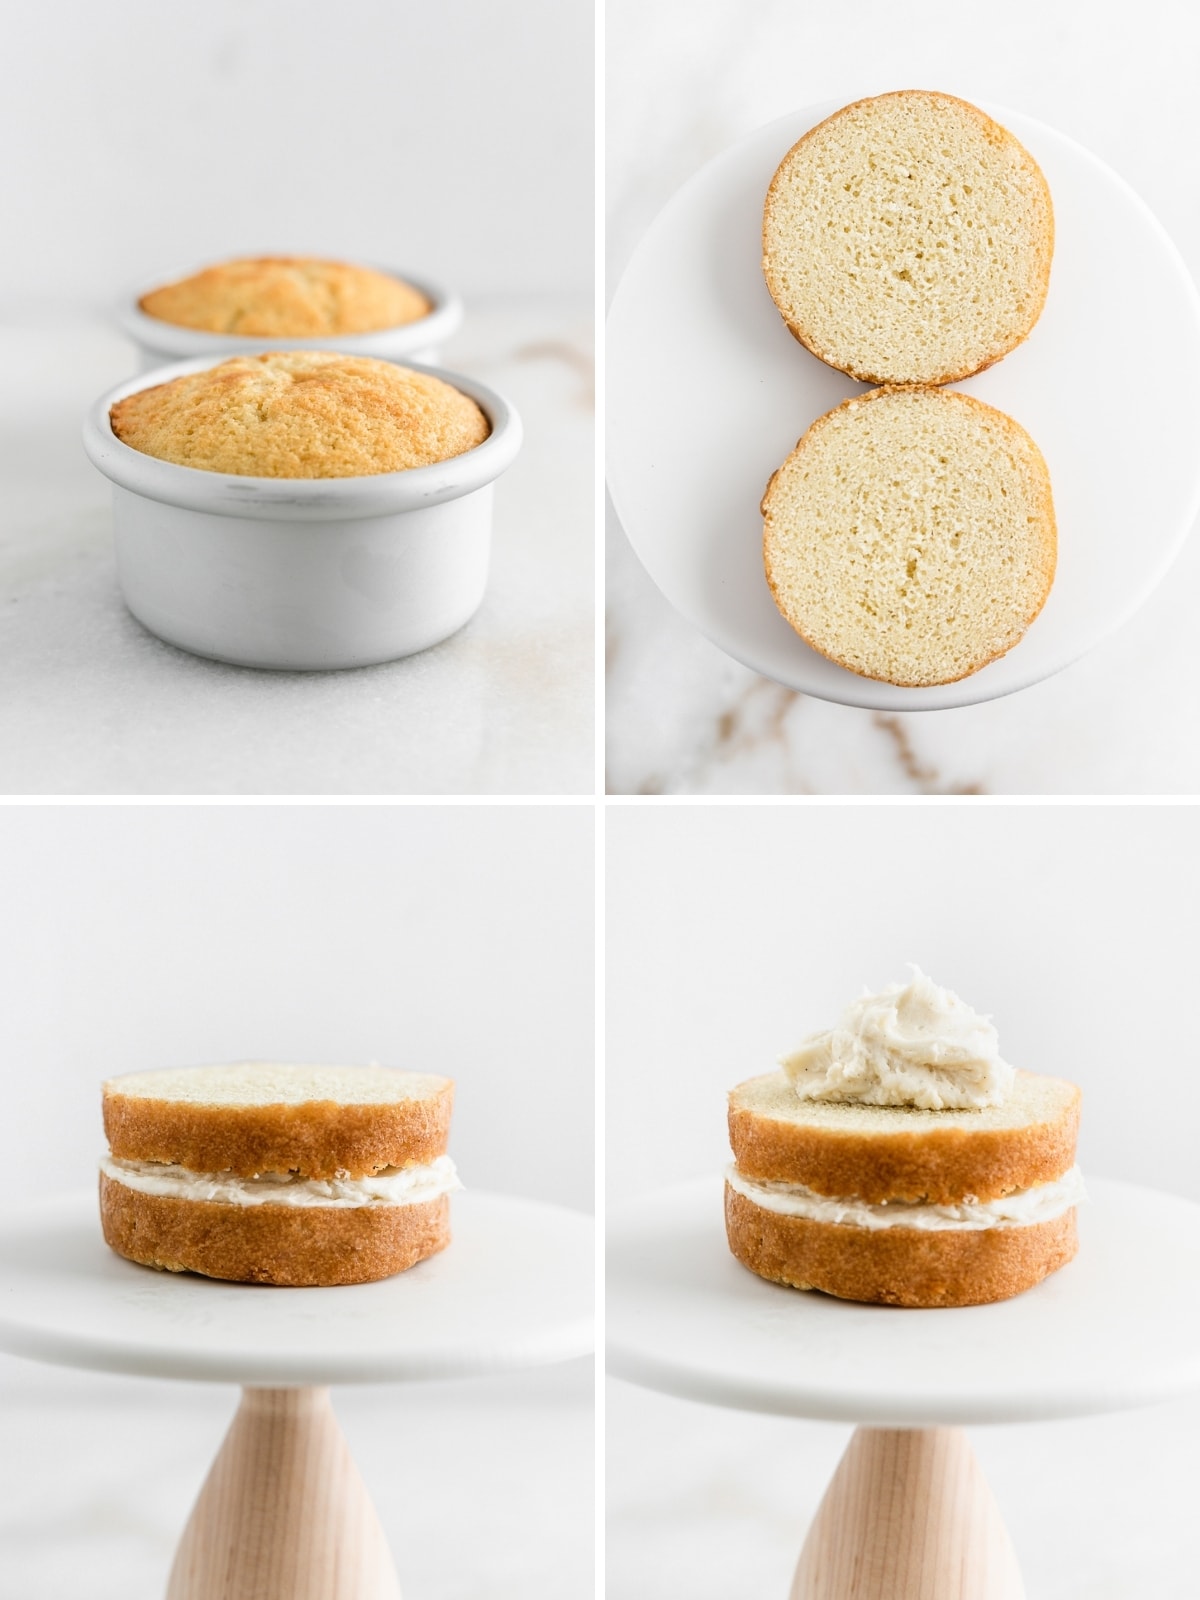
- Let the cakes cool, flip out of the pans and cool completely before frosting them.
- Make the frosting,
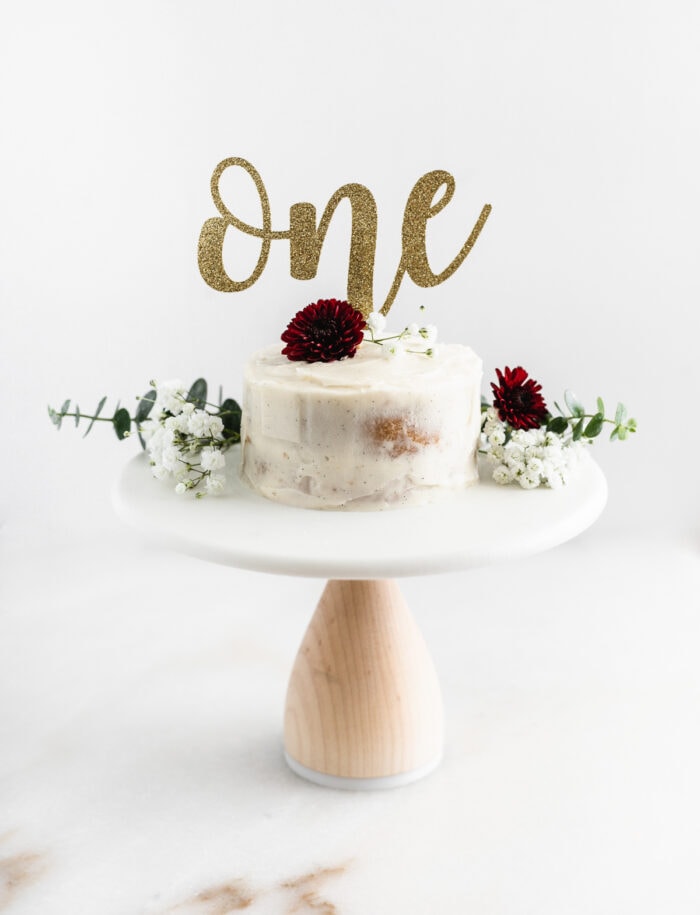
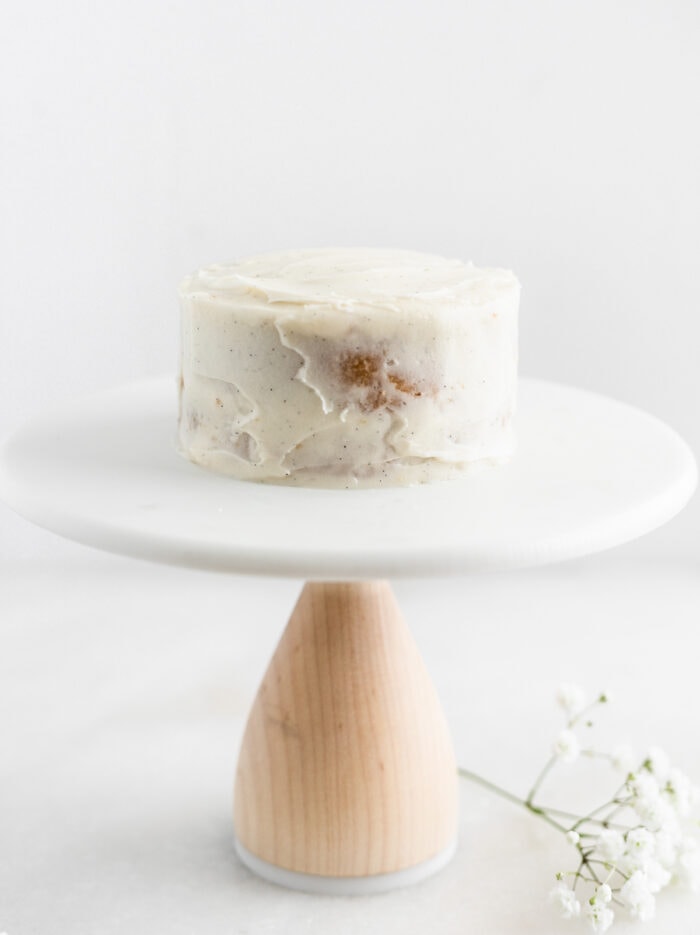
- Cut each cake in half horizontally into two rounds. Plop a little bit of frosting on top of one and spread it evenly on the cake. Add the top, plop on more frosting, then frost as desired. I like to do just a light layer of frosting for a semi 'naked' effect.
- Decorate to your heart's content and take all the photos!
What Pans Should I Use For a Smash Cake?
I used these 4 inch cake pans. Because I 'm a food blogger and I don't mind buying tiny pans. (Also I had two kids so I've used them at least twice so far!) But if you don't want to buy special cake pans, the 2-cup glass Pyrex glass storage containers (like this) also work well if you have them! With this option, you can make 3 cakes, or two taller ones. I have had readers comment about overflowing with 2 pans, so if you have any doubt, use 3. If you have them, you can also use two 6 inch pans for a shorter, wider smash cake.
Tips For Smash Cake Success
- Use room temperature ingredients for the best results.
- When measuring the flour, be sure to spoon it into the measuring cup then level it off for the best results.
- Grease and flour your pans well to avoid any sticking.
- Make sure the cakes are completely cooled before frosting. I even pop mine in the refrigerator. This ensures the crumbs don't get everywhere and make a mess with the frosting.
- If the cakes dome a little bit, use a serrated knife to level off the tops so that they are completely flat.
- If you made the frosting in advance, be sure to bring it to room temperature before frosting the cake so that it will spread more easily.
Can This Recipe Be Made in Advance?
Yes! Wrap the baked, cooled cakes in plastic wrap, then in foil. Store them in overnight at room temperature, in the refrigerator up to 2 days, or in the freezer up to a month. Then thaw before frosting. The frosting can be made 2-3 days in advance and stored in the refrigerator.
Decoration Ideas
I like to do a light layer of frosting for a semi 'naked' effect. But if you like more frosting, go for it! You can add a couple of drops of food coloring for colored frosting, too. Some decoration ideas include:
- Fresh flowers (like I did here) - baby's breath is my favorite for a one year old!
- Fresh berries or other fruit
- You can never go wrong with sprinkles!
- 'One' cake topper, like this glitter one, or '1' candle
Did you make this recipe? Please leave a star rating in the comments!
PrintVanilla Smash Cake

If your baby is turning one year old soon, you'll need a smash cake! You can make 2 tiny homemade cakes that are cute and delicious with this easy recipe for vanilla smash cake.
- Prep Time: 30 minutes (active)
- Cook Time: 30 minutes
- Total Time: 1 hour
- Yield: 2 smash cakes 1x
- Category: dessert
- Method: baked
- Cuisine: American
Ingredients
For the Cake:
- 1 cup + 2 tbsp flour
- ½ tsp baking powder
- ¼ tsp baking soda
- ¼ tsp fine sea salt
- 1 stick (½ cup) butter, softened
- ⅔ cup sugar
- 1 egg + 1 yolk
- 1 tsp vanilla bean paste or vanilla extract
- ½ cup buttermilk
- 4 tbsp (¼ cup) butter, softened
- 1/2 lb box powdered sugar (about 2 cups)
- ½ tsp vanilla bean paste or vanilla extract
- 2-3 tablespoon milk
- ⅛ tsp salt, if using unsalted butter
Instructions
- Heat oven to 350°F. Grease and flour 3 (four inch) cake pans or 2 (six inch) cake pans.
- Whisk flour, baking soda, baking powder and salt in a bowl. Set aside.
- In the bowl of a stand mixer, or in a large bowl with hands beaters, beat butter and sugar together until smooth, about 2-3 minutes. Scrape down the sides with a spatula, if needed.
- Add the egg, yolk and vanilla. Beat until smooth.
- With the mixer on low speed, add half of the dry ingredients, then the buttermilk, then the other half of the dry ingredients. Mix until just combined, stopping to scrape down the sides as needed.
- Divide the batter evenly into prepared pans.
- Bake until a toothpick inserted in the center of each cake comes out clean, about 18-20 minutes.
- Let cakes cool at least 10 minutes before turning out onto a wire cooling rack to cool completely.
- To make the frosting, beat room temperature butter, powdered sugar, vanilla, and salt in the bowl of a stand mixer, or in a large bowl with a hand mixer, until smooth.
- Add milk, 1 tablespoon at a time, as necessary to reach a fluffy but slightly stiff consistency. If frosting becomes too runny, add a bit more powdered sugar.
- Cut completely cooled cakes in half horizontally so that each cake now has two rounds.
- Scoop a small bit of frosting onto the top one round. Top with remaining round and frost as desired. Repeat with remaining cake to produce two cakes. (See notes about other options)
- Decorate, take all the cute photos you want, then remove the decorations before you let baby smash the cake!
Notes
- Use room temperature ingredients for the best results.
- When measuring the flour, be sure to spoon it into the measuring cup then level it off for the best results.
- Grease and flour your pans well to avoid any sticking.
- Make sure the cakes are completely cooled before frosting. I even pop mine in the refrigerator. This ensures the crumbs don't get everywhere and make a mess with the frosting.
- If the cakes dome a little bit, use a serrated knife to level off the tops so that they are completely flat.
- If you made the frosting in advance, be sure to bring it to room temperature before frosting the cake so that it will spread more easily.
- Recipe adapted from Sally's Baking Addiction.
Cake pan options:
- Use 3 four-inch cake pans, and cut each cake in half to produce 3 smash cakes.
- I have also used 2 four inch cake pans (as photographed), but have had others readers report overflowing with this option. If you use two small pans, be sure they are at least 2 inches tall and increase the baking time by about 5 minutes.
- Use 2 6-inch cake pans for one slightly shorter and wider cake (reduce baking time by a few minutes).
- Use round, 2-cup glass pyrex storage containers if you have them and don't wish to buy tiny cake pans (the recipe will be the same as written, but may take a couple minutes longer).
- If you want to avoid the fuss of cutting a cake in half and frosting the center, frost the baby cakes as they are, or stack them for a very tall cake!
To make in advance:
- Prepare the recipe as written. After removing cakes from the pans, let them cool completely then wrap in plastic wrap and then in foil. refrigerate up to 2 days or freeze cakes until you're ready to use. Thaw most of the way before frosting.
- The frosting can be made up to 3 days in advance and stored in the refrigerator.
Keywords: how to make a smash cake, vanilla smash cake, homemade smash cake for babies
Tatiana says
I cut the recipe in half and made in 2 ramekins to practice for baby's birthday since I want to decorate it a certain way, and my husband and I loved this cake.
Megan Vadnais says
Can I sub the sugar for something else?
Jillian says
I did the Pyrex bowl method and it worked great, cake turned out so cute and delicious! Thanks for this
★★★★★
E J says
Idk what I did wrong but this tastes like cornbread and was way too flakey. Sadly a failed recipe but maybe it was something I did wrong?
★
Carla says
These were easy to put together. I used 3 of the 4” Pyrex. I baked for about 30 minutes, and they came out very nice! I’m excited to frost for my grandson’s first birthday!
★★★★★
Maja says
These little cakes came out soooo good! The Pyrex idea was perfect and the cakes came out great! They cooked for about 28 min.
★★★★★
Jessica says
Really easy to make !
★★★★★
Dana says
I am not a good baker but these cakes came out beautiful. I can’t wait for my little one to do his cake smash tomorrow!
★★★★★
Lauren says
Where is this adorable stand from?
Bailey says
Hi! I love this recipe and have used it for both my little ones smash cakes. I would love to know how to make it into a regular sized cake!
Karen says
I followed the directions exactly and used the 4-inch pans. There was much, much too much batter, which overflowed and is now all over my oven floor. I should have realized there was too much batter and not filled the pans so high, I guess!
★
Kaleigh says
I'm sorry that your batter overflowed! The pans I used were two inches tall.
Lindsay says
Karen, you shouldn’t have posted a 1 star because you messed up.